一、在shader中实现高光反射光照模型
本篇在unity实现高光反射。
在之前给出了基本光照模型中高光反射部分计算公式:
Cspecular=(Clight∗mspecular)*pow(max(0,v^∗r^),gloss)
从公式可以看出,计算高光反射需要知道4个参数:
入射光线的颜色和强度Clight
材质的高光反射系数mspecular
视角方向v^
反射方向r^
其中,反射方向r^可以由表面法线n^和光源方向l^计算而得:
r^=l^-2(n^·l^)n^
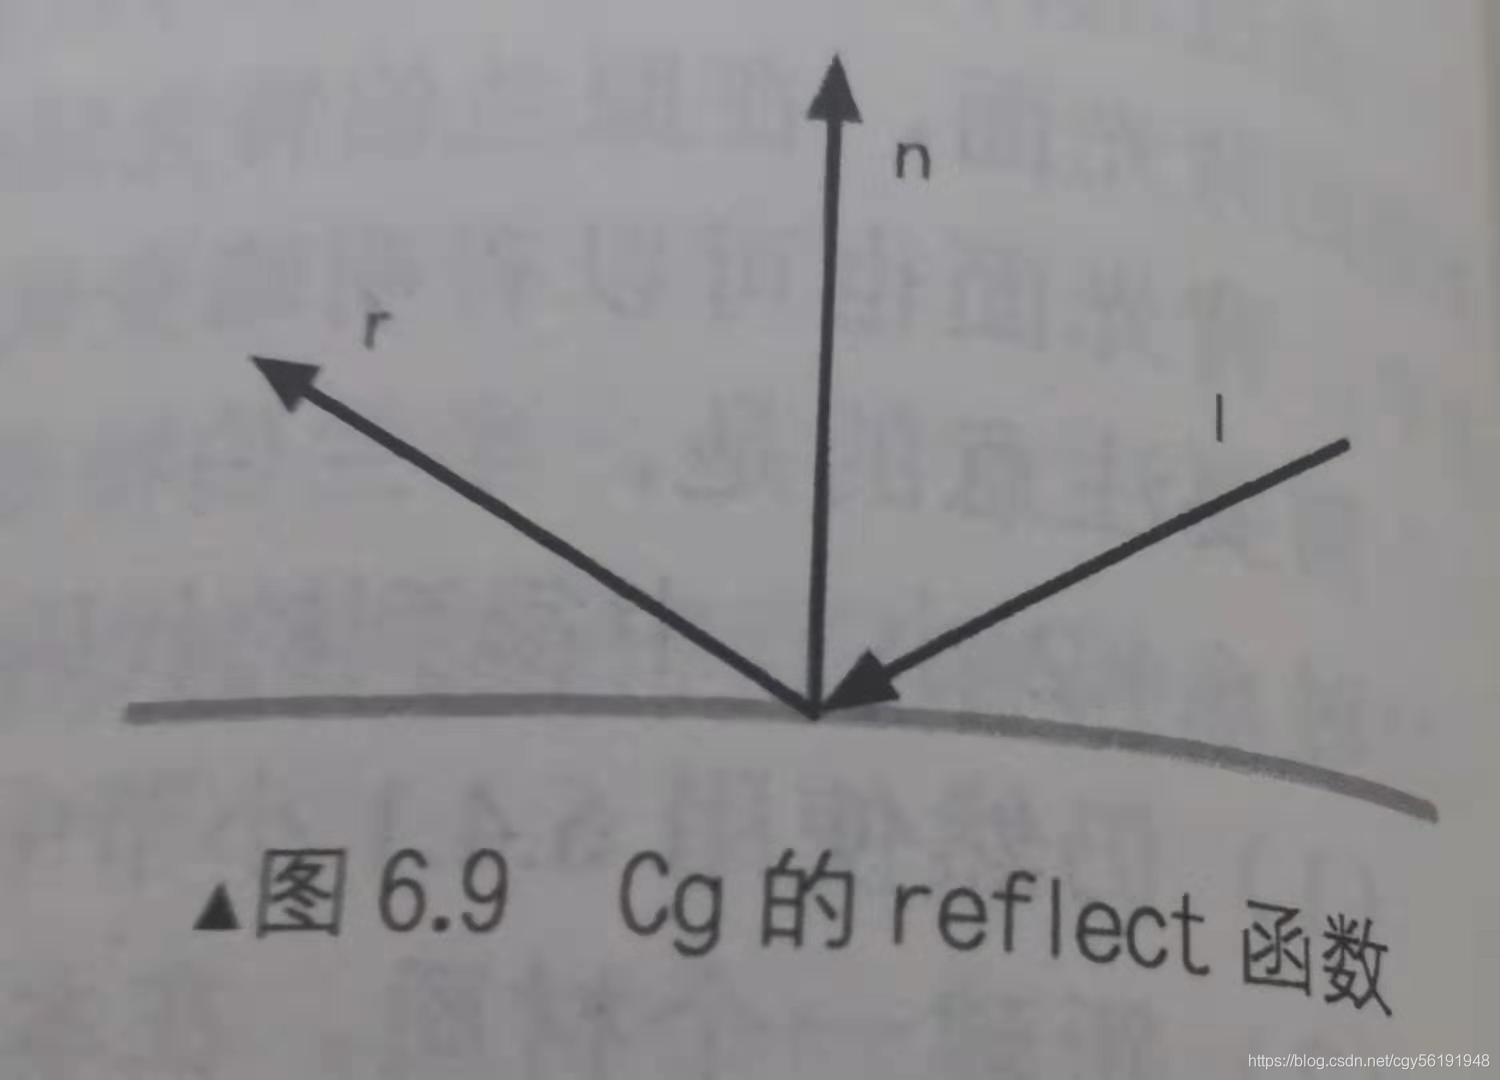
并且,Cg提供了计算反射方向的函数reflect。
函数:reflect(i,n)
参数:i,入射方向;n,法线方向,可以是float、float2、float3等类型
描述:当给定入射方向i和法线方向n时,reflect函数可以返回反射方向,下图给出了参数和返回值之间的关系:
1.1 实践:逐顶点光照
1. 声明属性控制高光反射:
Properties {
		_Diffuse ("Diffuse", Color) = (1, 1, 1, 1)
		_Specular ("Specular", Color) = (1, 1, 1, 1)
		_Gloss ("Gloss", Range(8.0, 256)) = 20
	}
其中,_Specular用于控制材质高光反射颜色,而_Gloss用于控制高光区域大小。
2. 指明光照模式,声明指令,包含unity内置文件Lighting.cginc,定义对应变量:
Pass {
			Tags { "LightMode"="ForwardBase" }

			CGPROGRAM

			#pragma vertex vert
			#pragma fragment frag

			#include "Lighting.cginc"

			fixed4 _Diffuse;
			fixed4 _Specular;
			float _Gloss;
3. 定义顶点着色器的输入和输出结构体:
struct a2v {
				float4 vertex : POSITION;
				float3 normal : NORMAL;
			};

			struct v2f {
				float4 pos : SV_POSITION;
				fixed3 color : COLOR;
			};
4. 顶点着色器中,计算了包含高光反射的光照模型:
v2f vert(a2v v) {
				v2f o;
				// Transform the vertex from object space to projection space
				o.pos = UnityObjectToClipPos(v.vertex);

				// Get ambient term
				fixed3 ambient = UNITY_LIGHTMODEL_AMBIENT.xyz;

				// Transform the normal from object space to world space
				fixed3 worldNormal = normalize(mul(v.normal, (float3x3)unity_WorldToObject));
				// Get the light direction in world space
				fixed3 worldLightDir = normalize(_WorldSpaceLightPos0.xyz);

				// Compute diffuse term
				fixed3 diffuse = _LightColor0.rgb * _Diffuse.rgb * saturate(dot(worldNormal, worldLightDir));

				// Get the reflect direction in world space
				fixed3 reflectDir = normalize(reflect(-worldLightDir, worldNormal));
				// Get the view direction in world space
				fixed3 viewDir = normalize(_WorldSpaceCameraPos.xyz - mul(unity_ObjectToWorld, v.vertex).xyz);

				// Compute specular term
				fixed3 specular = _LightColor0.rgb * _Specular.rgb * pow(saturate(dot(reflectDir, viewDir)), _Gloss);

				o.color = ambient + diffuse + specular;

				return o;
			}
其中漫反射部分的计算和上一篇文章中代码一致。对于高光反射部分,首先计算了入射光线关于表面法线的反射方向reflectDir,由于Cg的reflect函数的入射方向要求是由光源指向交点处的,因此需要对worldLightDir取反再传给reflect函数,然后我们通过_WorldSpaceCameraPos得到了世界空间中的摄像机位置,再把顶点位置从模型空间变换到世界空间下,与其相减即可得到世界空间下的视角方向。
由此得到了所有的4个参数,代入公式可以得到高光反射的光照部分,最后再和环境光、漫反射光相加存储到最后颜色中。
5. 片元着色器代码只需直接返回顶点颜色:
fixed4 frag(v2f i) : SV_Target {
				return fixed4(i.color, 1.0);
			}
效果图:
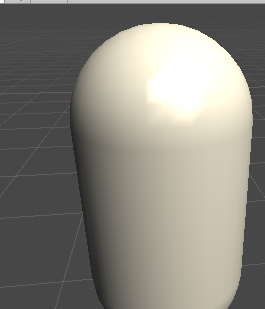
使用逐顶点方法得到的高光部分明显不平滑,主要是高光部分的计算是非线性的,而在顶点着色器中计算光照在进行插值的过程是线性的,破坏了原计算的非线性关系,就会出现较大视觉问题,因此就需要使用逐像素方法计算高光反射。
1.2 实践:逐像素光照
我们使用逐像素光照得到更加平滑的高光效果。
1. 修改顶点着色器输出结构体v2f:
	struct a2v {
				float4 vertex : POSITION;
				float3 normal : NORMAL;
			};

			struct v2f {
				float4 pos : SV_POSITION;
				float3 worldNormal : TEXCOORD0;
				float3 worldPos : TEXCOORD1;
			};
2. 顶点着色器只需要计算世界空间下的法线方向和顶点坐标,并把它们传递给片元着色器:
			v2f vert(a2v v) {
				v2f o;
				// Transform the vertex from object space to projection space
				o.pos = UnityObjectToClipPos(v.vertex);

				// Transform the normal from object space to world space
				o.worldNormal = mul(v.normal, (float3x3)unity_WorldToObject);
				// Transform the vertex from object spacet to world space
				o.worldPos = mul(unity_ObjectToWorld, v.vertex).xyz;

				return o;
			}
3. 片元着色器需要计算关键的光照模型:
fixed4 frag(v2f i) : SV_Target {
				// Get ambient term
				fixed3 ambient = UNITY_LIGHTMODEL_AMBIENT.xyz;

				fixed3 worldNormal = normalize(i.worldNormal);
				fixed3 worldLightDir = normalize(_WorldSpaceLightPos0.xyz);

				// Compute diffuse term
				fixed3 diffuse = _LightColor0.rgb * _Diffuse.rgb * saturate(dot(worldNormal, worldLightDir));

				// Get the reflect direction in world space
				fixed3 reflectDir = normalize(reflect(-worldLightDir, worldNormal));
				// Get the view direction in world space
				fixed3 viewDir = normalize(_WorldSpaceCameraPos.xyz - i.worldPos.xyz);
				// Compute specular term
				fixed3 specular = _LightColor0.rgb * _Specular.rgb * pow(saturate(dot(reflectDir, viewDir)), _Gloss);

				return fixed4(ambient + diffuse + specular, 1.0);
			}
效果图:
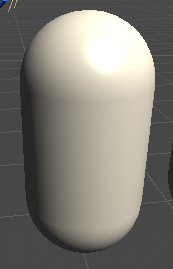
可以看出,按逐像素方式处理光照可以得到更平滑的高光效果,至此实现了一个完整的Phong光照模型。
1.3 Blinn-Phong光照模型
之前的文章提到过另一种高光反射实现方法——Blinn光照模型,Blinn光照模型没有使用反射方向,而是引入了一个新的矢量h^,它是通过对视角方向v^和光照方向相加后再归一化得到的,即:
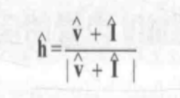
而Blinn模型计算高光反射公式如下:
Cspecular = Clight * mspecular * pow(max(0, dot(n^, h^), gloss))
Blinn-Phong模型的实现和上一小节代码很类似:
fixed4 frag(v2f i) : SV_Target {
				// Get ambient term
				fixed3 ambient = UNITY_LIGHTMODEL_AMBIENT.xyz;

				fixed3 worldNormal = normalize(i.worldNormal);
				fixed3 worldLightDir = normalize(_WorldSpaceLightPos0.xyz);

				// Compute diffuse term
				fixed3 diffuse = _LightColor0.rgb * _Diffuse.rgb * max(0, dot(worldNormal, worldLightDir));

				// Get the view direction in world space
				fixed3 viewDir = normalize(_WorldSpaceCameraPos.xyz - i.worldPos.xyz);
				// Get the half direction in world space
				fixed3 halfDir = normalize(worldLightDir + viewDir);
				// Compute specular term
				fixed3 specular = _LightColor0.rgb * _Specular.rgb * pow(max(0, dot(worldNormal, halfDir)), _Gloss);

				return fixed4(ambient + diffuse + specular, 1.0);
			}
下图给出逐顶点高光反射光照、逐像素高光反射光照(Phong模型)和Blinn-Phong高光反射光照的对比结果:
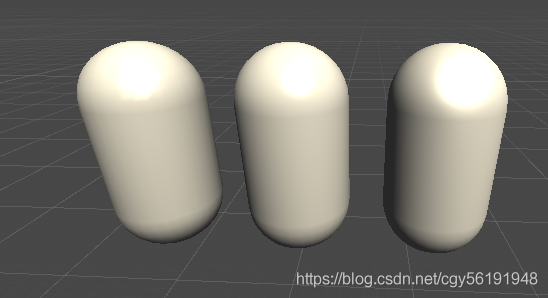
可以看出,Blinn-Phong光照模型的高光反射部分看起来更大、更亮一些。再实际渲染中,大多数情况都会选择Blinn-Phong光照模型,这两种模型都是经验模型,不应该认为Blinn-Phong模型是对“正确的”Phong模型的近似。
二、使用Unity内置的函数
再计算光照模型的时候,往往需要得到光源方向、视角方向这两个基本信息,上面例子中我们都是自行再代码计算的,但是如果需要处理更复杂的光照模型,如点光灯和聚光灯,我们之前计算光源方向的方法就是错误的,这需要我们在代码中先判断光源类型,再计算它的光源信息。
手动计算光源信息比较麻烦,unity提供了一些内置函数来帮助计算,下面给出UnityCG.cginc里一些有用的帮助函数:
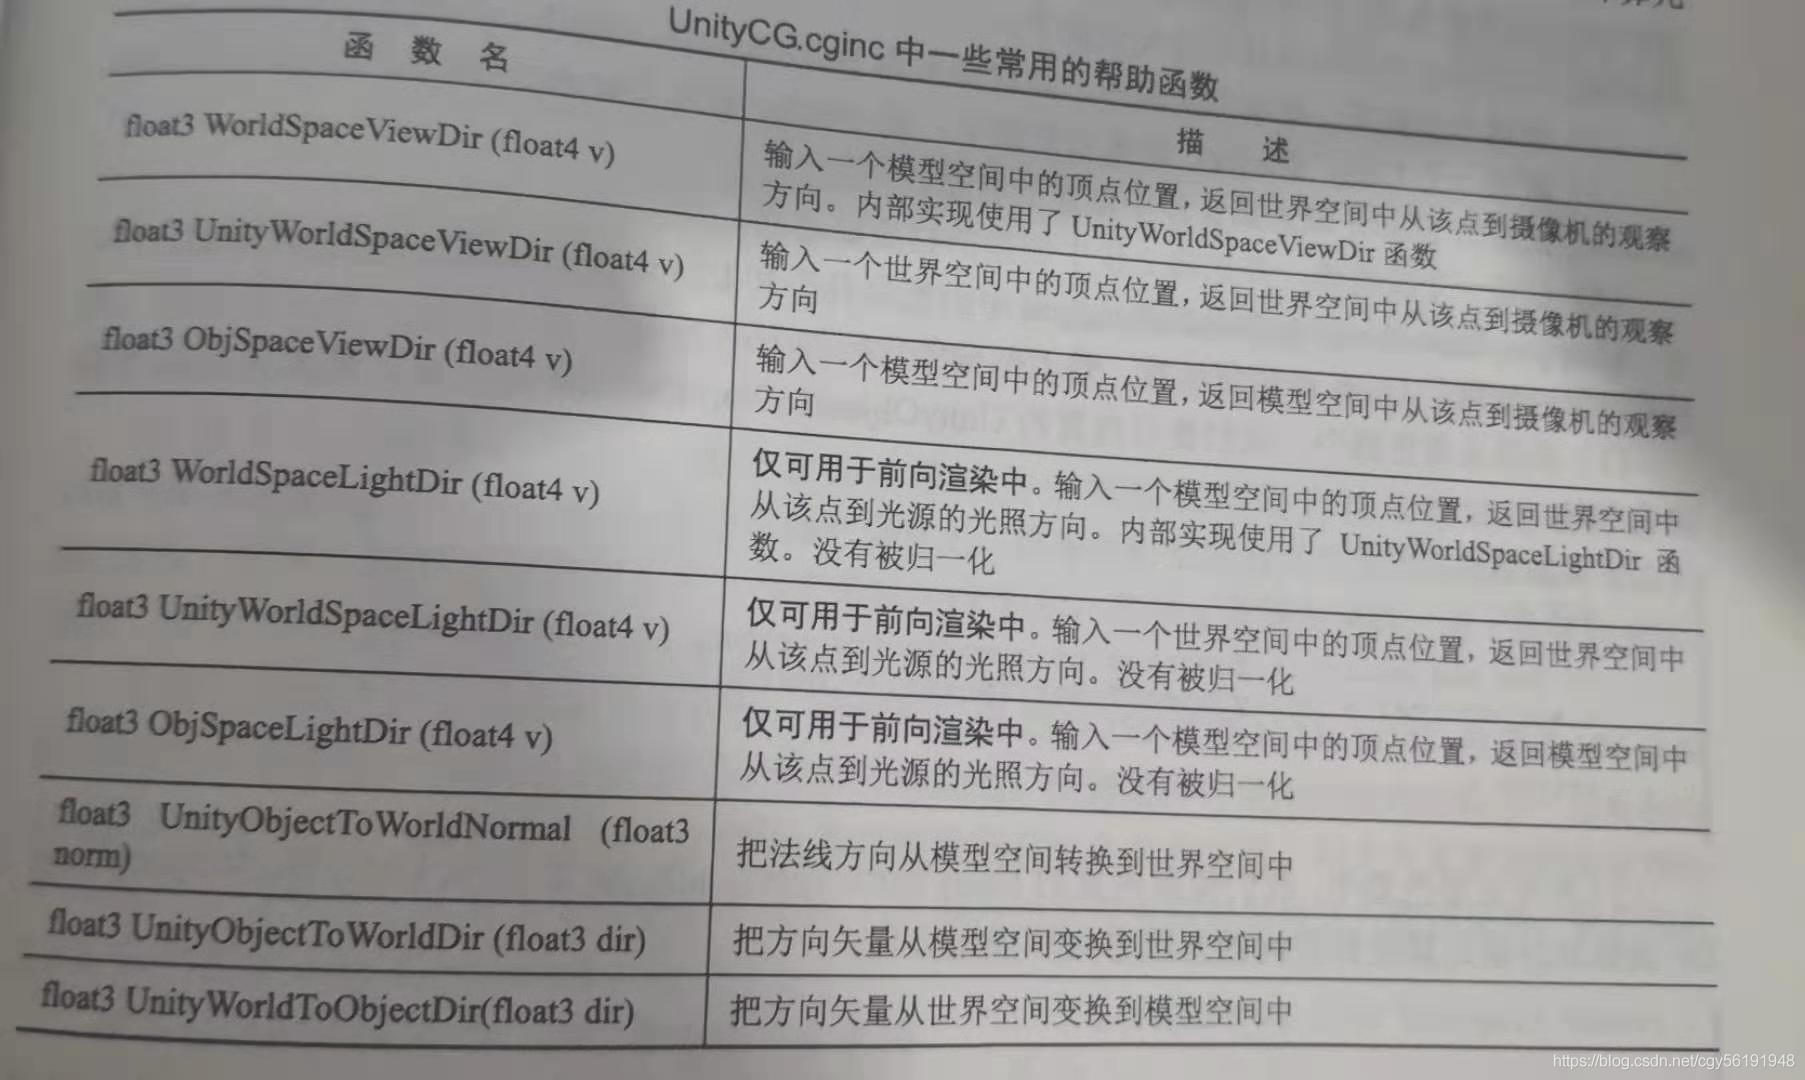
注意,类似UnityXXX的几个函数是unity5中新添加的内置函数。这些帮助函数让我们不需要各种变幻矩阵、内置变量打交道,也不需要考虑各种不同的情况(例如使用了哪种光源)。
需要注意,这些函数都没有保证得到的方向矢量是单位矢量,因此我们在使用前要把他们归一化。
计算光源方向的3个函数:WorldSpaceLightDir、UnityWorldSpaceLightDir、和ObjSpaceDir稍微复杂一些,因为unity帮我们处理了不同种类光源的情况。这三个函数仅可用于前向渲染,因为只有在前向渲染时,这3个函数使用的_WorldSpaceLightPos0等才会被正确赋值。
下面使用内置函数改写之前的Blinn-Phong 光照模型的shader:
1. 在顶点着色器中,使用内置的UnityObjectToWorldNormal函数计算世界空间下的法线方向:
v2f vert(a2v v) {
				v2f o;
				o.pos = UnityObjectToClipPos(v.vertex);

				// Use the build-in funtion to compute the normal in world space
				o.worldNormal = UnityObjectToWorldNormal(v.normal);

				o.worldPos = mul(unity_ObjectToWorld, v.vertex);

				return o;
			}
2. 在片元着色器中,使用内置的UnityWorldSpaceLightDir函数和UnityWorldSpaceViewDir函数分别计算世界空间的光照方向和视角方向。
fixed4 frag(v2f i) : SV_Target {
				fixed3 ambient = UNITY_LIGHTMODEL_AMBIENT.xyz;

				fixed3 worldNormal = normalize(i.worldNormal);
				//  Use the build-in funtion to compute the light direction in world space
				// Remember to normalize the result
				fixed3 worldLightDir = normalize(UnityWorldSpaceLightDir(i.worldPos));

				fixed3 diffuse = _LightColor0.rgb * _Diffuse.rgb * max(0, dot(worldNormal, worldLightDir));

				// Use the build-in funtion to compute the view direction in world space
				// Remember to normalize the result
				fixed3 viewDir = normalize(UnityWorldSpaceViewDir(i.worldPos));
				fixed3 halfDir = normalize(worldLightDir + viewDir);
				fixed3 specular = _LightColor0.rgb * _Specular.rgb * pow(max(0, dot(worldNormal, halfDir)), _Gloss);

				return fixed4(ambient + diffuse + specular, 1.0);
			}
版权声明:本文为CSDN博主「小橙子0」的原创文章,
遵循CC 4.0 BY-SA版权协议,转载请附上原文出处链接及本声明。
原文链接:https://blog.csdn.net/cgy56191948/article/details/102493517