输入附件是图像视图,可用于片段着色器内部的像素局部加载操作。这基本上意味着,可以在后续子通道中的同一像素(已被写入)处读取在一个子通道中写入的帧缓冲区附件。
虽然存在不能在固定像素坐标之外采样的局限限制了输入附件无法进行高级后处理等操作,比如你需要采样邻近的像素等操作,但使用输入附件仍具有自己的优势,例如用于延迟渲染器的G-Buffer合成,调试可视化和甚至命令独立透明。
如果你不使用输入附件的话,传统方式是使用多个渲染通道,其中第二遍将把附件图像视图用作例如组合图像。
tips: 渲染通道可以把两个管道相连,第一个管道生成场景的颜色和深度附件,第二个管道生成的颜色附件给交换链用于呈现
在基于图块的渲染器上(TBR),使用输入附件比传统的多通道渲染要快,因为像素读取是从图块内存而不是大缓冲区中获取数据的。因此,如果你是移动端vulkan开发的话,附件方式相对于多通道渲染来说是一个很好的选择。
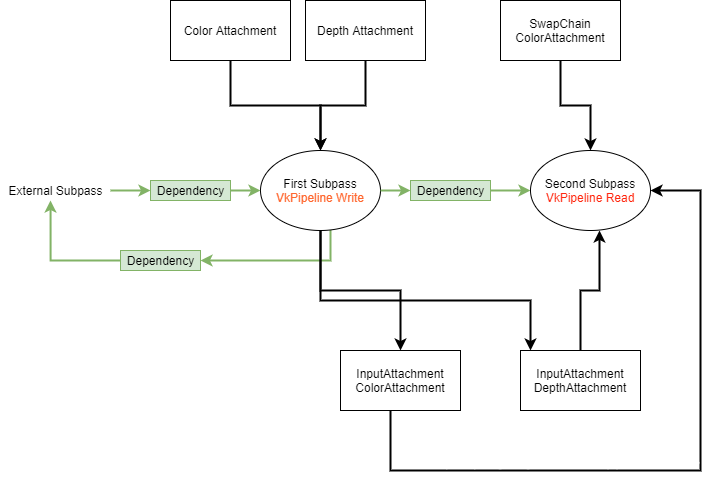
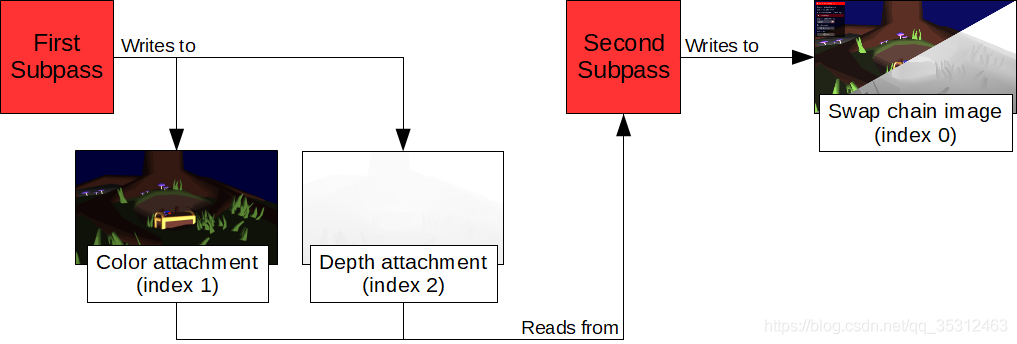
本部分,我们将在渲染过程中进行两个子过程。第一个子通道将填充颜色和深度图像,第二个子通道将从其中一个读取,并将它们写入交换链彩色图像。

一、帧缓冲设置
除了写入交换链(彩色)图像之外,我们还想填充输入附件的图像,因此我们将它们添加到作为附件创建的帧缓冲视图列表中:
	//全局变量
	struct {
		VkPipeline attachmentWrite;
		VkPipeline attachmentRead;
	} pipelines;

	struct {
		VkPipelineLayout attachmentWrite;
		VkPipelineLayout attachmentRead;
	} pipelineLayouts;

	struct {
		VkDescriptorSet attachmentWrite;
		std::vector<VkDescriptorSet> attachmentRead;
	} descriptorSets;

	struct {
		VkDescriptorSetLayout attachmentWrite;
		VkDescriptorSetLayout attachmentRead;
	} descriptorSetLayouts;

	struct FrameBufferAttachment {
		VkImage image;
		VkDeviceMemory memory;
		VkImageView view;
		VkFormat format;
	};
	struct Attachments {
		FrameBufferAttachment color, depth;
	};
	std::vector<Attachments> attachments;

	// 帧缓冲设置
	void setupFrameBuffer()
	{
		VkImageView views[3];

		VkFramebufferCreateInfo frameBufferCI{};
		frameBufferCI.sType = VK_STRUCTURE_TYPE_FRAMEBUFFER_CREATE_INFO;
		frameBufferCI.renderPass = renderPass;
		frameBufferCI.attachmentCount = 3;
		frameBufferCI.pAttachments = views;
		frameBufferCI.width = width;
		frameBufferCI.height = height;
		frameBufferCI.layers = 1;

		frameBuffers.resize(swapChain.imageCount);
		for (uint32_t i = 0; i < frameBuffers.size(); i++)
		{
			views[0] = swapChain.buffers[i].view;
			views[1] = attachments[i].color.view;
			views[2] = attachments[i].depth.view;
			vkCreateFramebuffer(device, &frameBufferCI, nullptr, &frameBuffers[i]);
		}
	}
二、子通道设置
在Vulkan中,渲染过程包括任意数量的子过程。子传递参考帧缓冲区附件以进行读取(和写入),了解它们与其他子传递的关系,并可用于添加隐式图像布局转换,因此不需要显式的图像存储屏障。
对于本示例,我们将在渲染过程中进行两个子过程。第一个子通道将填充颜色和深度图像,第二个子通道将从其中一个读取(取决于用户选择)并将滤镜应用于它们并将它们写入交换链彩色图像。
记住,framebuffers附件已设置为:
attachment[0] = swap chain color image
attachment[1] = (input attachment) color image
attachment[2] = (input attachment) depth image
这些索引将在子通道设置中引用。
第一个子通道将写入图像:
VkAttachmentReference colorReference{};
colorReference.attachment = 1;
colorReference.layout = VK_IMAGE_LAYOUT_COLOR_ATTACHMENT_OPTIMAL;

VkAttachmentReference depthReference{};
depthReference.attachment = 2;
depthReference.layout = VK_IMAGE_LAYOUT_DEPTH_STENCIL_ATTACHMENT_OPTIMAL;

subpassDescriptions[0].pipelineBindPoint = VK_PIPELINE_BIND_POINT_GRAPHICS;
subpassDescriptions[0].colorAttachmentCount = 1;
subpassDescriptions[0].pColorAttachments = &colorReference;
subpassDescriptions[0].pDepthStencilAttachment = &depthReference;
我们将自定义彩色图像作为唯一的颜色附件(附件索引1),将自定义深度图像(附件索引2)作为唯一的深度模板附件。通过此设置,此设置中使用的片段着色器可以写入位置0处的颜色附件,而无需显式写入深度附件。
第二个子通道将写入交换链彩色图像(附件索引0):
VkAttachmentReference colorReference{};
colorReference.attachment = 0;
colorReference.layout = VK_IMAGE_LAYOUT_COLOR_ATTACHMENT_OPTIMAL;

subpassDescriptions[1].pipelineBindPoint = VK_PIPELINE_BIND_POINT_GRAPHICS;
subpassDescriptions[1].colorAttachmentCount = 1;
subpassDescriptions[1].pColorAttachments = &colorReference;
并使用先前的颜色和深度图像作为输入附件:
VkAttachmentReference inputReferences[2]{};
inputReferences[0].attachment = 1;
inputReferences[0].layout = VK_IMAGE_LAYOUT_SHADER_READ_ONLY_OPTIMAL;

inputReferences[1].attachment = 2;
inputReferences[1].layout = VK_IMAGE_LAYOUT_SHADER_READ_ONLY_OPTIMAL;

subpassDescriptions[1].inputAttachmentCount = 2;
subpassDescriptions[1].pInputAttachments = inputReferences;
三、描述符
对于第二个子通道,它从颜色和深度图像读取,我们需要定义引用这些图像的描述符。这是通过VK_DESCRIPTOR_TYPE_INPUT_ATTACHMENT描述符类型完成的,剩下的只是您的标准设置,类似于使用组合图像采样器。
描述符集布局:
std::array<VkDescriptorSetLayoutBinding, 3> setLayoutBindings{};
setLayoutBindings[0].binding = 0;
setLayoutBindings[0].descriptorCount = 1;
setLayoutBindings[0].descriptorType = VK_DESCRIPTOR_TYPE_INPUT_ATTACHMENT;
setLayoutBindings[0].stageFlags = VK_SHADER_STAGE_FRAGMENT_BIT;

setLayoutBindings[1].binding = 1;
setLayoutBindings[1].descriptorCount = 1;
setLayoutBindings[1].descriptorType = VK_DESCRIPTOR_TYPE_INPUT_ATTACHMENT;
setLayoutBindings[1].stageFlags = VK_SHADER_STAGE_FRAGMENT_BIT;
...
图像描述符:
std::array<VkDescriptorImageInfo, 2> descriptors{};
descriptors[0].imageLayout = VK_IMAGE_LAYOUT_SHADER_READ_ONLY_OPTIMAL;
descriptors[0].imageView = attachments[i].color.view;
descriptors[0].sampler = VK_NULL_HANDLE;

descriptors[1].imageLayout = VK_IMAGE_LAYOUT_SHADER_READ_ONLY_OPTIMAL;
descriptors[1].imageView = attachments[i].depth.view;
descriptors[1].sampler = VK_NULL_HANDLE;
请注意,我们不会传递采样器,因为输入附件只是像素局部负载,因此不会以任何方式采样。通过读取它们,您将读取与先前在该位置写入的值完全相同的值。
描述符集:
std::array<VkWriteDescriptorSet, 3> writeDescriptorSets{};
writeDescriptorSets[0].dstSet = descriptorSets.attachmentRead[i];
writeDescriptorSets[0].descriptorType = VK_DESCRIPTOR_TYPE_INPUT_ATTACHMENT;
writeDescriptorSets[0].descriptorCount = 1;
writeDescriptorSets[0].dstBinding = 0;
writeDescriptorSets[0].pImageInfo = &descriptors[0];

writeDescriptorSets[1].dstSet = descriptorSets.attachmentRead[i];
writeDescriptorSets[1].descriptorType = VK_DESCRIPTOR_TYPE_INPUT_ATTACHMENT;
writeDescriptorSets[1].descriptorCount = 1;
writeDescriptorSets[1].dstBinding = 1;
writeDescriptorSets[1].pImageInfo = &descriptors[1];

...
vkUpdateDescriptorSets(device, 3, writeDescriptorSets.data(), 0, nullptr);
四、管道设置
使用多个子通道时,您需要传递在管道创建时使用了某个管道的子通道:
// 写管线
pipelineCI.subpass = 0;
pipelineCI.layout = pipelineLayouts.attachmentWrite;
vkCreateGraphicsPipelines(...&pipelines.attachmentWrite);

// 读管线
pipelineCI.subpass = 1;
pipelineCI.layout = pipelineLayouts.attachmentRead;
vkCreateGraphicsPipelines(...&pipelines.attachmentRead);
五、渲染
当开始渲染过程时,它总是从第一个子过程开始,然后只有一个子过程被使用。但是我们使用了多个子通道,因此使用vkCmdNextSubpass命令将当前活动渲染通道中的下一个子通道使用:
vkBeginCommandBuffer(drawCmdBuffers[i], &cmdBufInfo);

vkCmdBeginRenderPass(drawCmdBuffers[i], &renderPassBeginInfo, VK_SUBPASS_CONTENTS_INLINE);

// 第一通道
vkCmdBindPipeline(drawCmdBuffers[i], VK_PIPELINE_BIND_POINT_GRAPHICS, pipelines.attachmentWrite);
vkCmdBindDescriptorSets(drawCmdBuffers[i], VK_PIPELINE_BIND_POINT_GRAPHICS, pipelineLayouts.attachmentWrite, 0, 1, &descriptorSets.attachmentWrite, 0, NULL);
vkCmdBindVertexBuffers(drawCmdBuffers[i], 0, 1, &scene.vertices.buffer, offsets);
vkCmdBindIndexBuffer(drawCmdBuffers[i], scene.indices.buffer, 0, VK_INDEX_TYPE_UINT32);
vkCmdDrawIndexed(drawCmdBuffers[i], scene.indexCount, 1, 0, 0, 0);

// 第二通道
vkCmdNextSubpass(drawCmdBuffers[i], VK_SUBPASS_CONTENTS_INLINE);

vkCmdBindPipeline(drawCmdBuffers[i], VK_PIPELINE_BIND_POINT_GRAPHICS, pipelines.attachmentRead);
vkCmdBindDescriptorSets(drawCmdBuffers[i], VK_PIPELINE_BIND_POINT_GRAPHICS, pipelineLayouts.attachmentRead, 0, 1, &descriptorSets.attachmentRead[i], 0, NULL);
vkCmdDraw(drawCmdBuffers[i], 3, 1, 0, 0);

vkCmdEndRenderPass(drawCmdBuffers[i]);

vkEndCommandBuffer(drawCmdBuffers[i]);
这看起来与基本的单遍设置没有太大不同。调用vkCmdNextsubpass之后,附件将转换,并且我们从第一个子遍起写入目标的信息现在将用作输入附件,并传递到命令缓冲区状态。
六、着色器
尚未讨论的一件事是如何从片段着色器中实际读取输入附件。为此,Vulkan向glsl引入了新的统一类型和语法:
layout (input_attachment_index = 0, set = 0, binding = 0) uniform subpassInput inputColor;
layout (input_attachment_index = 1, set = 1, binding = 1) uniform subpassInput inputDepth;
我们得到一个称为subpassInput的新统一类型,以及一个用于指定输入附件的索引,设置和绑定的布局语法。后两个与所有制服相同,并且必须与描述符匹配。
input_attachment_index仅指定在帧缓冲区创建时指定的附件索引。
然后,通过使用subpassLoad而不是通常用于从图像采样的texture()函数来从输入附件中进行读取:
subpassLoad(uniform subpassInput);
有关这些新Vulkan glsl类型和关键字的详细信息,您可以参考GL_KHR_vulkan_glsl扩展。
完整读shader如下:
#version 450

layout (input_attachment_index = 0, binding = 0) uniform subpassInput inputColor;
layout (input_attachment_index = 1, binding = 1) uniform subpassInput inputDepth;

layout (binding = 2) uniform UBO {
	vec2 brightnessContrast;
	vec2 range;
	int attachmentIndex;
} ubo;

layout (location = 0) out vec4 outColor;

vec3 brightnessContrast(vec3 color, float brightness, float contrast) {
	return (color - 0.5) * contrast + 0.5 + brightness;
}

void main()
{
	// 对颜色输入应用亮度和对比度滤镜
	if (ubo.attachmentIndex == 0) {
		// 从之前的颜色输入附件读取颜色
		vec3 color = subpassLoad(inputColor).rgb;
		outColor.rgb = brightnessContrast(color, ubo.brightnessContrast[0], ubo.brightnessContrast[1]);
	}

	// 可视化深度输入范围
	if (ubo.attachmentIndex == 1) {
		// 从之前的深度输入附件中读取深度
		float depth = subpassLoad(inputDepth).r;
		outColor.rgb = vec3((depth - ubo.range[0]) * 1.0 / (ubo.range[1] - ubo.range[0]));
	}
}
我们接下来再看一下写的shader:
#version 450

layout (location = 0) in vec3 inColor;
layout (location = 1) in vec3 inNormal;
layout (location = 2) in vec3 inViewVec;
layout (location = 3) in vec3 inLightVec;

layout (location = 0) out vec4 outColor;

void main()
{
	// 卡通着色输出
	float intensity = dot(normalize(inNormal), normalize(inLightVec));
	float shade = 1.0;
	shade = intensity < 0.5 ? 0.75 : shade;
	shade = intensity < 0.35 ? 0.6 : shade;
	shade = intensity < 0.25 ? 0.5 : shade;
	shade = intensity < 0.1 ? 0.25 : shade;

	outColor.rgb = inColor * 3.0 * shade;

	// 深度附件不需要显式地编写
}
————————————————
版权声明:本文为CSDN博主「沉默的舞台剧」的原创文章,遵循CC 4.0 BY-SA版权协议,转载请附上原文出处链接及本声明。
原文链接:https://blog.csdn.net/qq_35312463/article/details/109136971


