另一个非常流行的非真实感渲染是素描风格的渲染。有篇著名的论文中提到过,使用了提前生成的素描纹理来实现实时的素描风格渲染,这些纹理组成了一个色调艺术映射,这些纹理笔触逐渐增多,用于模拟不同光照下的漫反射结果,从上到下对应了每张纹理的多级渐远纹理,这些纹理的生成并不是简单的对上一层纹理进行降采样,而是需要保持笔触之间的间隔,以便更真实的模拟素描效果。
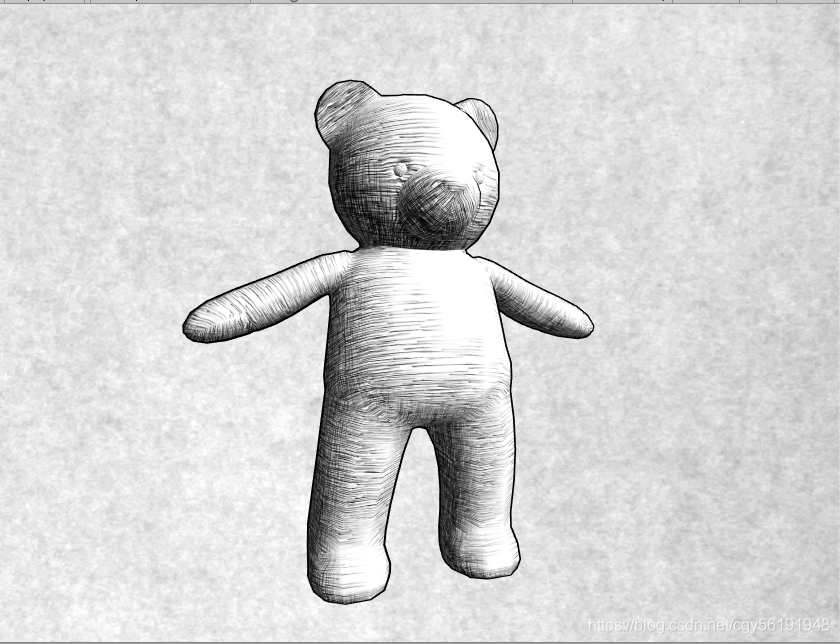
本节我们使用6张素描纹理进行渲染,在渲染阶段首先在顶点着色器阶段计算逐顶点光照,根据光照结果来决定6张纹理的混合权重。并传递给片元着色器,然后在片元着色器中根据这些权重混合6张纹理的采样结果,如下图:
实现:
1. 声明各个属性:
Properties {
_Color ("Color Tint", Color) = (1, 1, 1, 1)
_TileFactor ("Tile Factor", Float) = 1
_Outline ("Outline", Range(0, 1)) = 0.1
_Hatch0 ("Hatch 0", 2D) = "white" {}
_Hatch1 ("Hatch 1", 2D) = "white" {}
_Hatch2 ("Hatch 2", 2D) = "white" {}
_Hatch3 ("Hatch 3", 2D) = "white" {}
_Hatch4 ("Hatch 4", 2D) = "white" {}
_Hatch5 ("Hatch 5", 2D) = "white" {}
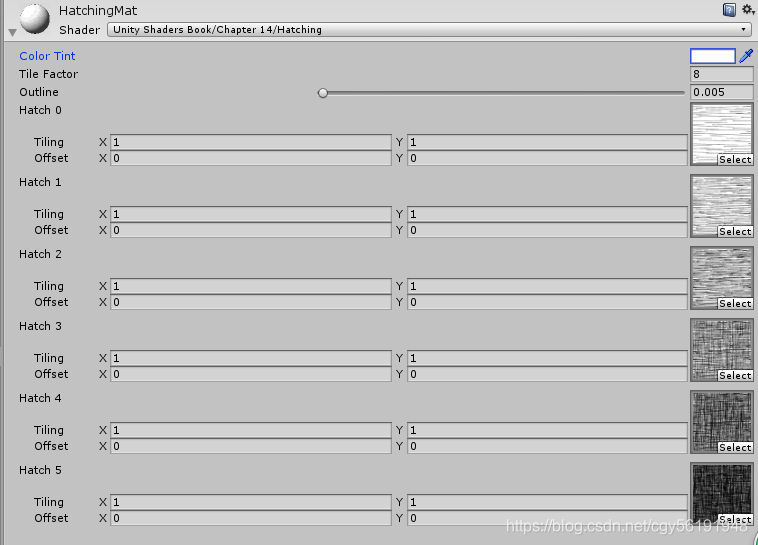
}其中_Color用于控制模型颜色的属性。_TileFactor是纹理的平铺系数,_TileFactor越大,模型上的素描线条越密,_Hatch0至_Hatch5对应了渲染时使用的6张素描纹理,它们的线条密度依次增大。
2. 由于素描风格往往也需要在物体周围渲染轮廓线(描边)。因此直接使用上篇文章我们卡通风格的渲染轮廓线Pass,直接UsePass"Pass名称(大写的)"。
3. 下面定义光照模型模型所在的Pass,为了正确获取各个光照变量,我们设置了Pass的标签和相关的编译指令:
Pass {
			Tags { "LightMode"="ForwardBase" }

			CGPROGRAM

			#pragma vertex vert
			#pragma fragment frag

			#pragma multi_compile_fwdbase
4. 由于我们需要在顶点着色器中计算6张纹理的混合权重,首先在v2f结构体中添加相应变量:
struct v2f {
				float4 pos : SV_POSITION;
				float2 uv : TEXCOORD0;
				fixed3 hatchWeights0 : TEXCOORD1;
				fixed3 hatchWeights1 : TEXCOORD2;
				float3 worldPos : TEXCOORD3;
				SHADOW_COORDS(4)
			};
一共声明了6张纹理,这意味着需要6个混合权重,我们把他们存储在两个fixed3类型的变量(hatchWeights0和hatchWeights1)中。为了添加阴影效果,我们还声明了worldPos变量,并使用SHADOW_COORDS宏声明了阴影纹理的采样坐标。
5. 然后定义了顶点着色器:
v2f vert(a2v v) {
				v2f o;

				o.pos = mul(UNITY_MATRIX_MVP, v.vertex);

				o.uv = v.texcoord.xy * _TileFactor;

				fixed3 worldLightDir = normalize(WorldSpaceLightDir(v.vertex));
				fixed3 worldNormal = UnityObjectToWorldNormal(v.normal);
				fixed diff = max(0, dot(worldLightDir, worldNormal));

				o.hatchWeights0 = fixed3(0, 0, 0);
				o.hatchWeights1 = fixed3(0, 0, 0);

				float hatchFactor = diff * 7.0;

				if (hatchFactor > 6.0) {
					// Pure white, do nothing
				} else if (hatchFactor > 5.0) {
					o.hatchWeights0.x = hatchFactor - 5.0;
				} else if (hatchFactor > 4.0) {
					o.hatchWeights0.x = hatchFactor - 4.0;
					o.hatchWeights0.y = 1.0 - o.hatchWeights0.x;
				} else if (hatchFactor > 3.0) {
					o.hatchWeights0.y = hatchFactor - 3.0;
					o.hatchWeights0.z = 1.0 - o.hatchWeights0.y;
				} else if (hatchFactor > 2.0) {
					o.hatchWeights0.z = hatchFactor - 2.0;
					o.hatchWeights1.x = 1.0 - o.hatchWeights0.z;
				} else if (hatchFactor > 1.0) {
					o.hatchWeights1.x = hatchFactor - 1.0;
					o.hatchWeights1.y = 1.0 - o.hatchWeights1.x;
				} else {
					o.hatchWeights1.y = hatchFactor;
					o.hatchWeights1.z = 1.0 - o.hatchWeights1.y;
				}

				o.worldPos = mul(unity_ObjectToWorld, v.vertex).xyz;

				TRANSFER_SHADOW(o);

				return o;
			}
首先对顶点进行基本坐标变换,然后使用_TileFactor得到了纹理采样坐标。在计算6张纹理混合权重之前,我们首先计算逐顶点光照。因此使用世界空间下的光照方向和法线方向得到漫反射系数。把权重值初始化为0,并把diff缩放到[0,7]范围,得到hatchFactor。我们把[0,7]的区间均匀划分为7个子区间,通过判断hatchFactor所处的子区间来计算对应的纹理混合权重。最后我们计算了顶点的世界坐标。
6. 接下来定义片元着色器:
fixed4 frag(v2f i) : SV_Target {
				fixed4 hatchTex0 = tex2D(_Hatch0, i.uv) * i.hatchWeights0.x;
				fixed4 hatchTex1 = tex2D(_Hatch1, i.uv) * i.hatchWeights0.y;
				fixed4 hatchTex2 = tex2D(_Hatch2, i.uv) * i.hatchWeights0.z;
				fixed4 hatchTex3 = tex2D(_Hatch3, i.uv) * i.hatchWeights1.x;
				fixed4 hatchTex4 = tex2D(_Hatch4, i.uv) * i.hatchWeights1.y;
				fixed4 hatchTex5 = tex2D(_Hatch5, i.uv) * i.hatchWeights1.z;
				fixed4 whiteColor = fixed4(1, 1, 1, 1) * (1 - i.hatchWeights0.x - i.hatchWeights0.y - i.hatchWeights0.z -
							i.hatchWeights1.x - i.hatchWeights1.y - i.hatchWeights1.z);

				fixed4 hatchColor = hatchTex0 + hatchTex1 + hatchTex2 + hatchTex3 + hatchTex4 + hatchTex5 + whiteColor;

				UNITY_LIGHT_ATTENUATION(atten, i, i.worldPos);

				return fixed4(hatchColor.rgb * _Color.rgb * atten, 1.0);
			}
当得到了6张纹理的混合权重后,我们对每张纹理进行采样并和他们对应的权重值相乘,得到每张纹理的采样颜色。我们还计算了纯白在渲染中的贡献度,通过从1中减去所有6张纹理的权重来得到。这是因为素描中往往有留白的部分,因此我们希望在最后的渲染中光照最亮的部分是纯白色的,最后混合各个颜色,并和阴影值atten、模型颜色_Color相乘后返回最终的渲染结果。
版权声明:本文为CSDN博主「小橙子0」的原创文章,
遵循CC 4.0 BY-SA版权协议,转载请附上原文出处链接及本声明。
原文链接:https://blog.csdn.net/cgy56191948/article/details/102861645


